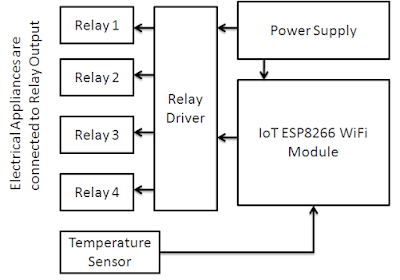
IOT based home automation project is done using low cost ESP8266 ESPino ESP-12 WiFi Module, It uses relays and few simple components, complete code and pcb layout is provided, for more details on software setup go through iot getting started tutorial from top menu. You can control four electrical devices and also you can monitor temperature. ESP-12 is low cost module we are using here,
Components Required:
1. ESP-12 WiFi Module
2. LM1117-3.3V
3. Sugar Cube Relay - Qty.4
4. Resistors 10K, 1K,4.7K
5. Capacitor 1000uF, 10uF, 104 (0.1uF)
6. PBT-2 Connectors Qty. 5
7. ULN2003
8. 12V Power Supply
With advancement of Automation technology, life is getting simpler and easier in all aspects. In today’s world Automatic systems are being preferred over manual system. With the rapid increase in the number of users of internet over the past decade has made Internet a part and parcel of life, and IoT is the latest and emerging internet technology. Internet of things is a growing network of everyday object-from industrial machine to consumer goods that can share information and complete tasks while you are busy with other activities. Wireless Home Automation system(WHAS) using IoT is a system that uses computers or mobile devices to control basic home functions and features automatically through internet from anywhere around the world, an automated home is sometimes called a smart home. It is meant to save the electric power and human energy. The home automation system differs from other system by allowing the user to operate the system from anywhere around the world through internet connection.
Step 1: Circuit Diagram
From the circuit diagram it is very clear that we have used few components, LM1117-3.3V is used for providing power supply to the ESP-12 WiFi Module.
ULN2003 provides relay driving.

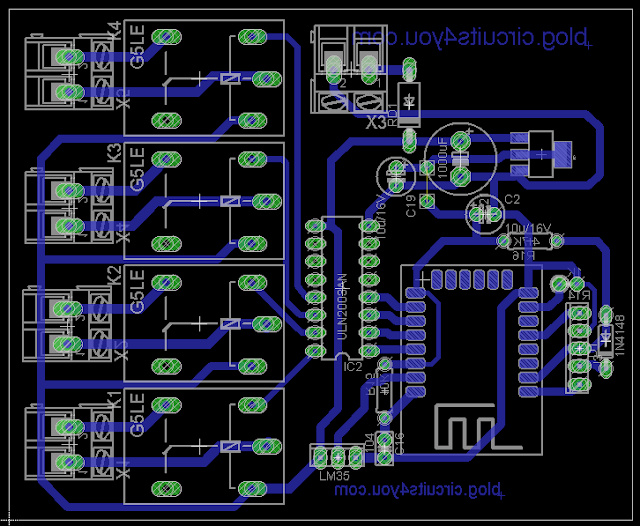
Step 2: PCB Layout
Make the pcb using layout provided in PDF

Step 3: Programming
Goto code page
Step 4: Testing
1. Turn on the circuit
2. Turn on WiFi on your mobile or Laptop
3. Enter 192.168.4.1 Ip in browser
4. You will find this page and operate the relays
5. Connect Relay output to the electrical load

For more information on IOT see Getting started tutorial from top menu
Components Required:
1. ESP-12 WiFi Module
2. LM1117-3.3V
3. Sugar Cube Relay - Qty.4
4. Resistors 10K, 1K,4.7K
5. Capacitor 1000uF, 10uF, 104 (0.1uF)
6. PBT-2 Connectors Qty. 5
7. ULN2003
8. 12V Power Supply
With advancement of Automation technology, life is getting simpler and easier in all aspects. In today’s world Automatic systems are being preferred over manual system. With the rapid increase in the number of users of internet over the past decade has made Internet a part and parcel of life, and IoT is the latest and emerging internet technology. Internet of things is a growing network of everyday object-from industrial machine to consumer goods that can share information and complete tasks while you are busy with other activities. Wireless Home Automation system(WHAS) using IoT is a system that uses computers or mobile devices to control basic home functions and features automatically through internet from anywhere around the world, an automated home is sometimes called a smart home. It is meant to save the electric power and human energy. The home automation system differs from other system by allowing the user to operate the system from anywhere around the world through internet connection.
Step 1: Circuit Diagram
From the circuit diagram it is very clear that we have used few components, LM1117-3.3V is used for providing power supply to the ESP-12 WiFi Module.
ULN2003 provides relay driving.

Step 2: PCB Layout
Make the pcb using layout provided in PDF

Step 3: Programming
Goto code page
Step 4: Testing
1. Turn on the circuit
2. Turn on WiFi on your mobile or Laptop
3. Enter 192.168.4.1 Ip in browser
4. You will find this page and operate the relays
5. Connect Relay output to the electrical load

For more information on IOT see Getting started tutorial from top menu


No comments:
Post a Comment