IR Obstacle Proximity Sensor Arduino Interface Tutorial
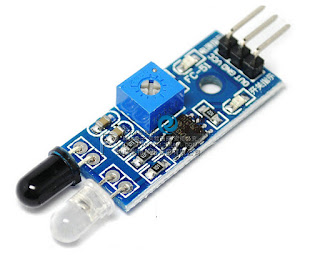
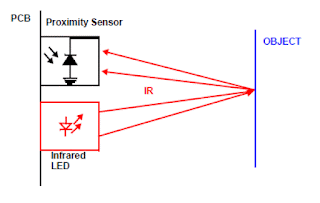
This is a multipurpose infrared sensor which can be used for obstacle sensing, color detection(between basic contrasting colors), fire detection, line sensing, etc and also as an encoder sensor. The sensor provides a digital output. The sensor outputs a logic one(+5V) at the digital output when an object is placed in front of the sensor and a logic zero(0V), when there is no object in front of the sensor. An on board LED is used to indicate the presence of an object. This digital output can be directly connected to an Arduino, Raspberry Pi, AVR, PIC, 8051 or any other microcontroller to read the sensor output.
IR sensors are highly susceptible to ambient light and the IR sensor on this sensor is suitably covered to reduce effect of ambient light on the sensor. T For maximum, range the on board potentiometer should be used to calibrate the sensor. To set the potentiometer, use a screw driver and turn the potentiometer till the output LED just turns off.
IR sensors are highly susceptible to ambient light and the IR sensor on this sensor is suitably covered to reduce effect of ambient light on the sensor. T For maximum, range the on board potentiometer should be used to calibrate the sensor. To set the potentiometer, use a screw driver and turn the potentiometer till the output LED just turns off.
Feature-
- Can be used for obstacle sensing, color detection(between basic contrasting colors), fire detection, line sensing, etc and also as an encoder sensor
- Input Voltage: 5V DC
- Comes with an easy to use digital output
- Can be used for wireless communication and sensing IR remote signals
- Sensor comes with ambient light protection
- The sensor a hole of 3mm diameter for easy mounting.
IR Sensor have three to four Lines
1. +5V VCC
2. GND
3. D0 or OUT (Digital Output)
4. A0 - Analog Out
Step 1: Connection Diagram
Arduino interfacing with IR Proximity sensor is very simple like interfacing of Switch with the arduino, The obstacle sensor gives logic 0 as output when there is no obstacle in front of it, and when obstacle is placed in front of it, it will give logic high output i.e. +5V. We need to read these logic changes on the arduino. using digitalRead Command. In my design I have connected its output to Pin 2 of Arduino You can use any other IO line as per your requirement.
Step 2: Programming the arduino
arduino code for ir proximity sensor interface
arduino code for ir proximity sensor interface
/*
  IR Proximity Sensor interface code
  Turns on an LED on when obstacle is detected, else off.
  blog.circuits4you.com 2016
 */


const int ProxSensor=2;

void setup() {
  // initialize the digital pin as an output.
  // Pin 13 has an LED connected on most Arduino boards:
  pinMode(13, OUTPUT);
  //Pin 2 is connected to the output of proximity sensor
  pinMode(ProxSensor,INPUT);
}

void loop() {
  if(digitalRead(ProxSensor)==HIGH)      //Check the sensor output
  {
    digitalWrite(13, HIGH);   // set the LED on
  }
  else
  {
    digitalWrite(13, LOW);    // set the LED off
  }
  delay(100);              // wait for a second
}
Step 3: Testing
1. Place the object in front of IR proximity sensor and observe the change in LED
connected to Pin 13 (on board LED)
2. When you remove object you will see it gets turned off.
3. You can program this to display message Obstacle detected using LCD
5. For measuring Linear distance using IR Sensors we have Sharp Distance sensor.


No comments:
Post a Comment