AVR Microcontroller based Temperature Controller, it uses LM35 Temperature Sensor for measurement of temperature and 16x2 LCD is used to display temperature set point, Heater Status and current temperature, It controls temperature by turning on and off of the heater using relay.
This project is very useful for controlling of temperature, It can be used for soldering station to make it automatic temperature controlled.
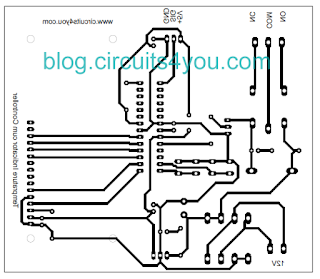
In this project two switches are used for setting the set points. You can try this project using Protius simulation. Circuit diagram, Layout is provided with code. Download respective files.
Simulation Results:
Step 1: Components Required
1. Atmega 8 Microcontroller
2. LM35 Temprature Sensor
3. 12V Relay
4. 16x2 LCD
5. BC548
6. 1K Ohm Resistors
7. Tectile Switches
Step 2: Circuit Design and PCB Manufacturing
Download Requires Files
1. Try Simulation Click Here to Download Protius Simulation File
2. Download pdf Complete Circuit Diagram
3. Download pdf PCB Layout
4. Download pdf Component Placement Diagram
5. Assemble components using above files.
Step 3: Programming the controller
Download Hex File
AVR Studio C Code
Step 4: Test the code and Hardware
1. Change temperature set point settings and observe the relay on/off operation
2. LCD display Should show the message as shown in simulation results.
3. Follow us on Google+
4. You Did it Yourself
5. Refer Tutorials from this site for more understanding of code and Circuits
This project is very useful for controlling of temperature, It can be used for soldering station to make it automatic temperature controlled.
In this project two switches are used for setting the set points. You can try this project using Protius simulation. Circuit diagram, Layout is provided with code. Download respective files.
Simulation Results:
Step 1: Components Required
1. Atmega 8 Microcontroller
2. LM35 Temprature Sensor
3. 12V Relay
4. 16x2 LCD
5. BC548
6. 1K Ohm Resistors
7. Tectile Switches
Step 2: Circuit Design and PCB Manufacturing
Download Requires Files
1. Try Simulation Click Here to Download Protius Simulation File
2. Download pdf Complete Circuit Diagram
3. Download pdf PCB Layout
4. Download pdf Component Placement Diagram
5. Assemble components using above files.
Step 3: Programming the controller
Download Hex File
AVR Studio C Code
//=================================================================
/* Temprature Controller Software           */
/* 2nd Dec 2005                             */
/* Copyright 2005 Circuits4You.com          */
/* WWW - http://www.circuits4you.com        */
/* Email - info@circuits4you.com            */

/* LCD Pin-5(R/W) must be connected to ground*/
//=================================================================
#include <avr/io.h>
#include <string.h>

#define E   PD7
#define RS   PB0

void display(char string[16], char LineNo);
void displaybyte(char D);
void dispinit(void);
void epulse(void);
void delay_ms(unsigned int de);

//=================================================================
//        Main Function
//=================================================================
int main(void)
{
 char mystr[6];
 int Temperature,setpoint;
 setpoint=30;

 DDRB = 0xE1;  //Set LCD Port Direction
 DDRD = 0xE0;
 PORTB = 0x06; //Pull up for switches

  delay_ms(500);  //Initiaize LCD
  dispinit();
  delay_ms(200);
 display("Temperature:32 C",1);
 display("Set:40C Heat:OFF",2);
  while(1)
  {
    //Measure Temprature and Display
    ADMUX=0xE5;
    ADCSRA=0xC7;
    while (!(ADCSRA & (1<<ADIF)));
    Temperature=ADCH;
    ADCSRA |= 1<<4; //ADCSRA = ADCSRA OR (0b00010000)
    sprintf(mystr, "%03d", Temperature);
    display("Temperature::",1);
    displaybyte(mystr[1]);
    displaybyte(mystr[2]);
    displaybyte(0xDF);
    displaybyte('C');
    displaybyte(0x20);
  //Change Set Points
  if((PINB & 0x02)==0x00) //Down Switch is pressed
  {
   if(setpoint>10)
   {
    setpoint--;
   }
  }

  if((PINB & 0x04)==0x00) //Up Switch is pressed
  {
   if(setpoint<99)
   {
    setpoint++;
   }
  }

  //Compare with Set Points and operate Relay
  if(Temperature>setpoint)
  {
   //Heater Off
    sprintf(mystr, "%03d", setpoint);
    display("Set:",2);
    displaybyte(mystr[1]);
    displaybyte(mystr[2]);
    displaybyte(0xDF);
    displaybyte(0x20);

    displaybyte('H');displaybyte('e');displaybyte('a');displaybyte('t');displaybyte(':');
    displaybyte('O');displaybyte('F');displaybyte('F');
    PORTB &= ~(1<<PB5);
  }
  else
  {
   //Heater On
    sprintf(mystr, "%03d", setpoint);
    display("Set:",2);
    displaybyte(mystr[1]);
    displaybyte(mystr[2]);
    displaybyte(0xDF);
    displaybyte(0x20);

    displaybyte('H');displaybyte('e');displaybyte('a');displaybyte('t');displaybyte(':');
    displaybyte('O');displaybyte('N');displaybyte(' ');
    PORTB |= (1<<PB5);
  }
  }
}

//=================================================================
//        LCD Display Initialization Function
//=================================================================
void dispinit(void)
{
 int count;
 char init[]={0x43,0x03,0x03,0x02,0x28,0x01,0x0C,0x06,0x02,0x02};

 PORTB &= ~(1<<RS);           // RS=0
 for (count = 0; count <= 9; count++)
  {
 displaybyte(init[count]);
  }
 PORTB |= 1<<RS;    //RS=1
}


//=================================================================
//        Enable Pulse Function
//=================================================================
void epulse(void)
{
 PORTD |= 1<<E;
  delay_ms(10); //Adjust delay if required
 PORTD &= ~(1<<E);
 delay_ms(10); //Adjust delay if required
}


//=================================================================
//        Send Single Byte to LCD Display Function
//=================================================================
void displaybyte(char D)
{
//D4=PD6
//D5=PD5
//D6=PB7
//D7=PB6
 //data is in Temp Register
  char K1;
  K1=D;
  K1=K1 & 0xF0;
  K1=K1 >> 4;  //Send MSB

  PORTD &= 0x9F;  //Clear data pins
  PORTB &= 0x3F;

  if((K1 & 0x01)==0x01){PORTD |= (1<<PD6);}
  if((K1 & 0x02)==0x02){PORTD |= (1<<PD5);}
  if((K1 & 0x04)==0x04){PORTB |= (1<<PB7);}
  if((K1 & 0x08)==0x08){PORTB |= (1<<PB6);}

 epulse();

  K1=D;
  K1=K1 & 0x0F;  //Send LSB
  PORTD &= 0x9F;  //Clear data pins
  PORTB &= 0x3F;

  if((K1 & 0x01)==0x01){PORTD |= (1<<PD6);}
  if((K1 & 0x02)==0x02){PORTD |= (1<<PD5);}
  if((K1 & 0x04)==0x04){PORTB |= (1<<PB7);}
  if((K1 & 0x08)==0x08){PORTB |= (1<<PB6);}
 epulse();
}

//=================================================================
//        Display Line on LCD at desired location Function
//=================================================================
void display(char string[16], char LineNo)
{
 int len,count;

 PORTB &= ~(1<<RS);           // RS=0 Command Mode

 if(LineNo==1)
 {
  displaybyte(0x80);  //Move Coursor to Line 1
 }
 else
 {
  displaybyte(0xC0);  //Move Coursor to Line 2
 }
 PORTB |= (1<<RS);           // RS=1 Data Mode


  len = strlen(string);

   for (count=0;count<len;count++)
  {
    displaybyte(string[count]);
 }
}


//=================================================================
//        Delay Function
//=================================================================
void delay_ms(unsigned int de)
{
unsigned int rr,rr1;
   for (rr=0;rr<de;rr++)
   {

  for(rr1=0;rr1<30;rr1++)   //395
  {
   asm("nop");
  }

   }
}
Step 4: Test the code and Hardware
1. Change temperature set point settings and observe the relay on/off operation
2. LCD display Should show the message as shown in simulation results.
3. Follow us on Google+
4. You Did it Yourself
5. Refer Tutorials from this site for more understanding of code and Circuits


No comments:
Post a Comment