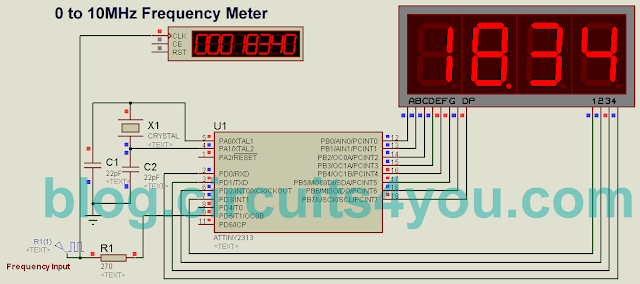
This is simplest frequency meter (counter) with Atmel AVR ATtiny2313. It allows to measure frequencies up to 10 MHz in 4 automatically selected ranges. Lowest range has a resolution of 1Hz. A 4-digit LED display is used to display the measured frequency. It is based on a Atmel AVR ATtiny2313A or ATTiny2313 microcontroller. The program to download you can find below. The microprocessor is clocked from 20MHz crystal (the maximum allowable frequency). The measurement accuracy is determined by the accuracy of this crystal. Minimum length of half period of the measured signal must be greater than the period of the crystal oscillator (restriction of the MCU architecture). At 50% duty cycle can therefore you can measure frequencies up to 10 MHz. The measured signal is input to pin 9 (T1). Counting is performed by a 16-bit timer/counter1, which is externally clocked. Overflow increments a 8-bit register, making in a 24-bit result. It is then transferred to the decadic form and displayed. The frequency is always displayed in kHz. Automatic range selection changes the position of the decimal point. The refresh rate is 1Hz. Cathodes of displays are connected to port B, the anodes to bits 0-3 of port D. Using the superbright display allows you to omit usual current amplifying transistors. The display is controlled in multiplex and connected the usual multiplex manner. Frequency of the multiplex is 156.25 Hz. You can use the display for example CA56-12SRWA. Resistors R1 to R8 determine the current into the display and thus its brightness. They are chosen so that the current does not exceed the maximum output current (40 mA) of pins. This frequency meter is powered from a supply of approximately 5V (+/- 10%). Consumption at 5V is about 15-35 mA, depending on the number of lit segments (most current consumption has the LED display). If the input of the frequency counter is "in free air", it can cause display meaningless values because the input impedance is very high. You can prevent this by adding a resistor around 100k in parallel to the input.
Step 1: Circuit Diagram
Add 1KOhm Resistors in series with display segments to limit the current.
Step 2: Code
Download Hex File
Step 3: Fuse Bits Settings
1. External Crystal
2. CLKDIV8 Unprogrammed(1)


No comments:
Post a Comment